![Google Pixel 6](http://wmstatic.global.ssl.fastly.net/ml/7220224-f-ce7aa4a7-4379-49e6-a447-4a9cfb41d2ec.png?width=150&height=320)
Google Pixel 6
Android 12.0
1. Find "Passwords & accounts"
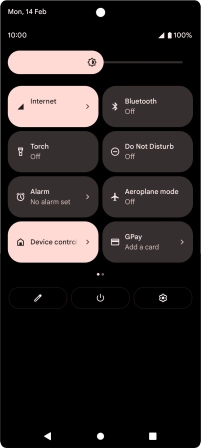
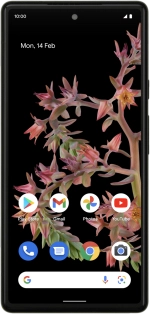
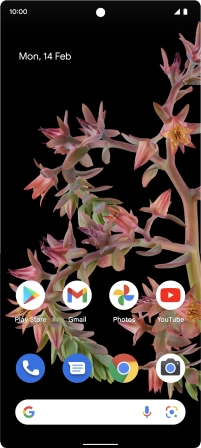
Slide two fingers downwards starting from the top of the screen.
![](http://wmstatic.global.ssl.fastly.net/ml/7220224-f-2403b8b5-696f-4f37-baae-22cdb6112801.png?width=202&height=448)
Press the settings icon.
![](http://wmstatic.global.ssl.fastly.net/ml/7220224-f-34653378-5e74-4f58-bd27-6b13a135a365.png?width=202&height=448)
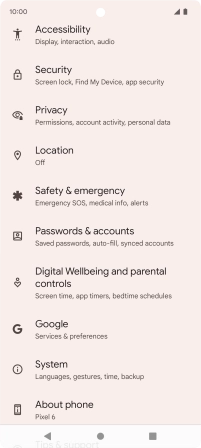
Press Passwords & accounts.
![](http://wmstatic.global.ssl.fastly.net/ml/7220224-f-79296fbe-268b-409d-bb57-ef7a292e0ecd.png?width=202&height=448)
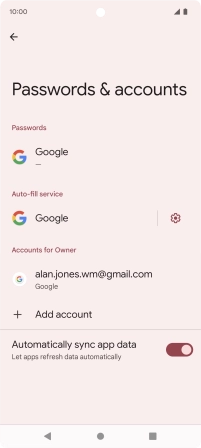
2. Create new email account
Press Add account.
![](http://wmstatic.global.ssl.fastly.net/ml/7220224-f-022be52b-86e8-44cf-b9ae-2da428b24237.png?width=202&height=448)
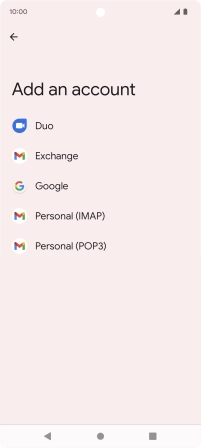
3. Select server type
Press Exchange.
![](http://wmstatic.global.ssl.fastly.net/ml/7220224-f-eb46b379-7e21-4b67-a065-c5cd8bc8b998.png?width=202&height=448)
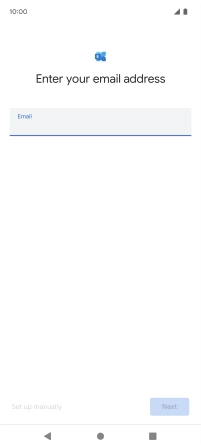
4. Enter email address
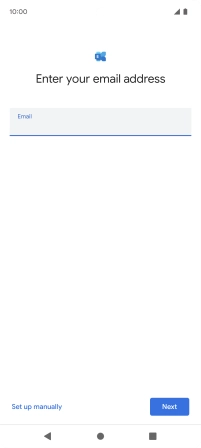
Press the field below "Email" and key in your email address.
![](http://wmstatic.global.ssl.fastly.net/ml/7220224-f-91a159c2-970a-497a-b5d9-cdf88a24fd0b.png?width=202&height=448)
Press Next.
![](http://wmstatic.global.ssl.fastly.net/ml/7220224-f-4d226368-14df-48af-aa67-064c590a3351.png?width=202&height=448)
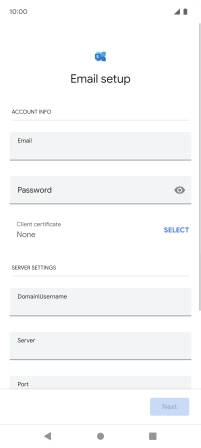
5. Enter password
Press Password and key in the password for your email account.
![](http://wmstatic.global.ssl.fastly.net/ml/7220224-f-ae74612a-04de-4cbe-a535-eac25b9ac44b.png?width=202&height=448)
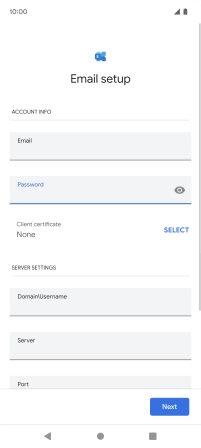
6. Select client certificate
To turn on the function, press SELECT and follow the instructions on the screen to install the required certificate.
![](http://wmstatic.global.ssl.fastly.net/ml/7220224-f-45400c12-17c3-47d2-bea5-bb26d8d657f6.png?width=202&height=448)
7. Enter domain and username
Press the field below "Domain\Username" and key in the domain and username separated by a "\".
![](http://wmstatic.global.ssl.fastly.net/ml/7220224-f-45400c12-17c3-47d2-bea5-bb26d8d657f6.png?width=202&height=448)
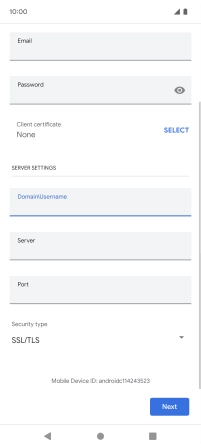
8. Enter server name
Press the field below "Server" and key in the server address.
![](http://wmstatic.global.ssl.fastly.net/ml/7220224-f-845c1b8a-5309-4826-9ce4-02bddc3a5746.png?width=202&height=448)
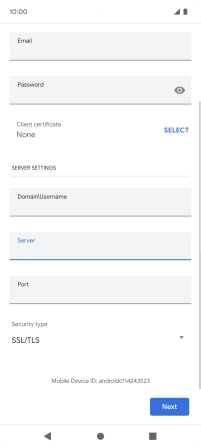
9. Enter incoming port
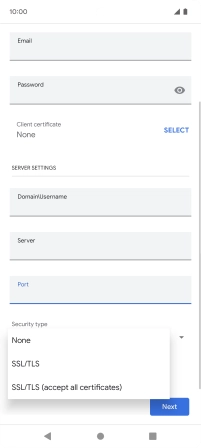
Press the field below "Port" and key in the required port number.
![](http://wmstatic.global.ssl.fastly.net/ml/7220224-f-9601a672-5de9-4e8f-8e8b-5d6a60da9c5b.png?width=202&height=448)
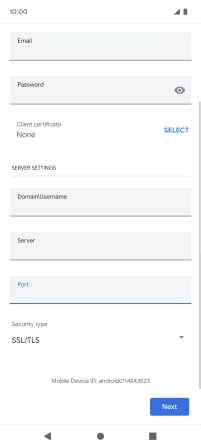
10. Turn SSL encryption on or off
Press the drop down list below "Security type".
![](http://wmstatic.global.ssl.fastly.net/ml/7220224-f-2139a815-01e1-4471-b2f8-4b759d8d6aab.png?width=202&height=448)
Press the required setting.
![](http://wmstatic.global.ssl.fastly.net/ml/7220224-f-54bb80ef-6844-4f07-bd80-402e8f0e121a.png?width=202&height=448)
Press Next.
![](http://wmstatic.global.ssl.fastly.net/ml/7220224-f-2139a815-01e1-4471-b2f8-4b759d8d6aab.png?width=202&height=448)
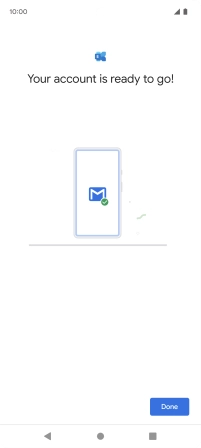
Press Done.
![](http://wmstatic.global.ssl.fastly.net/ml/7220224-f-3eee5eef-32bc-4d16-a969-2af29b30049f.png?width=202&height=448)
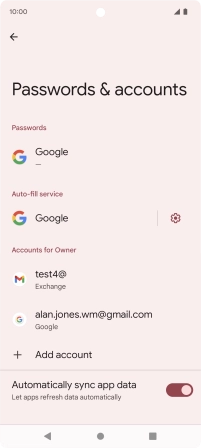
11. Enter email account name
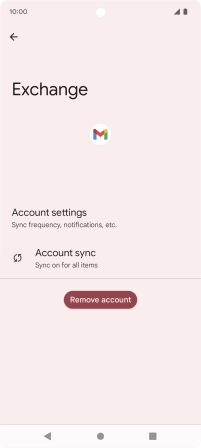
Press the required email account.
![](http://wmstatic.global.ssl.fastly.net/ml/7220224-f-d6aa88f8-3099-421a-afd0-50eab98c51f5.png?width=202&height=448)
Press Account settings.
![](http://wmstatic.global.ssl.fastly.net/ml/7220224-f-36f1c314-2521-46d3-a973-abf33a9c27ee.png?width=202&height=448)
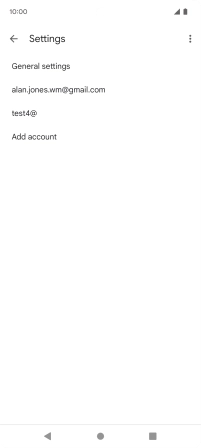
Press the required email account.
![](http://wmstatic.global.ssl.fastly.net/ml/7220224-f-9de43baf-ce77-4c3c-852c-19bd4eb66022.png?width=202&height=448)
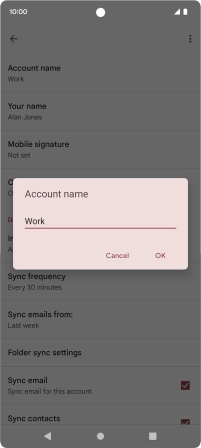
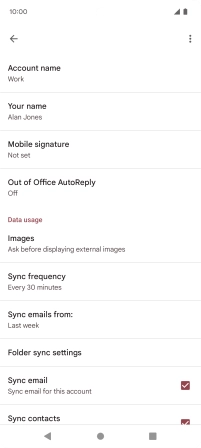
Press Account name and key in the required name.
![](http://wmstatic.global.ssl.fastly.net/ml/7220224-f-87d0c65f-df5d-4224-b2fd-9a0ae7dd2ec0.png?width=202&height=448)
Press OK.
![](http://wmstatic.global.ssl.fastly.net/ml/7220224-f-fd39b1ea-e792-4115-bc1d-346873bf3ac3.png?width=202&height=448)
12. Enter sender name
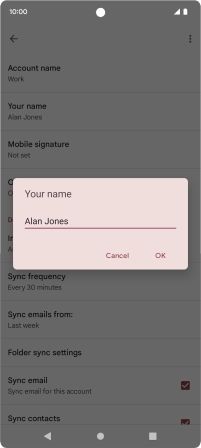
Press Your name and key in the required sender name.
![](http://wmstatic.global.ssl.fastly.net/ml/7220224-f-87d0c65f-df5d-4224-b2fd-9a0ae7dd2ec0.png?width=202&height=448)
Press OK.
![](http://wmstatic.global.ssl.fastly.net/ml/7220224-f-65a44a58-5ffa-42e9-863e-962e8fd8e566.png?width=202&height=448)
13. Select settings for retrieval of new email messages
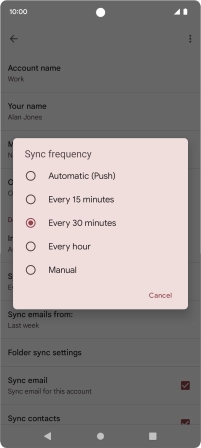
Press Sync frequency.
![](http://wmstatic.global.ssl.fastly.net/ml/7220224-f-87d0c65f-df5d-4224-b2fd-9a0ae7dd2ec0.png?width=202&height=448)
Press the required setting.
![](http://wmstatic.global.ssl.fastly.net/ml/7220224-f-0b1b6647-bd24-4d5f-a1f4-571be2b32b31.png?width=202&height=448)
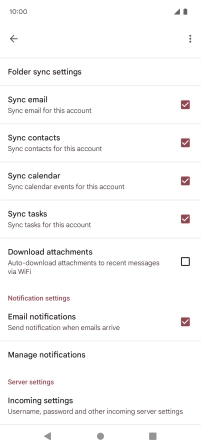
14. Turn on email message synchronisation
Press the field next to "Sync email" to turn on the function.
![](http://wmstatic.global.ssl.fastly.net/ml/7220224-f-922fb75c-df07-4bf7-8df0-429254587b37.png?width=202&height=448)
15. Turn contact synchronisation on or off
Press the field next to "Sync contacts" to turn the function on or off.
![](http://wmstatic.global.ssl.fastly.net/ml/7220224-f-922fb75c-df07-4bf7-8df0-429254587b37.png?width=202&height=448)
16. Turn calendar synchronisation on or off
Press the field next to "Sync calendar" to turn the function on or off.
![](http://wmstatic.global.ssl.fastly.net/ml/7220224-f-922fb75c-df07-4bf7-8df0-429254587b37.png?width=202&height=448)
17. Turn email message notifications on or off
Press the field next to "Email notifications" to turn the function on or off.
![](http://wmstatic.global.ssl.fastly.net/ml/7220224-f-922fb75c-df07-4bf7-8df0-429254587b37.png?width=202&height=448)
18. Return to the home screen
Slide your finger upwards starting from the bottom of the screen to return to the home screen.
![](http://wmstatic.global.ssl.fastly.net/ml/7220224-f-9de43baf-ce77-4c3c-852c-19bd4eb66022.png?width=202&height=448)