![OPPO Reno8 Pro 5G](http://wmstatic.global.ssl.fastly.net/ml/7151223-f-590e8e6c-f24e-40dc-8a19-092e2a6582b5.png?width=150&height=320)
OPPO Reno8 Pro 5G
Android 12.0
1 Find "Access point names"
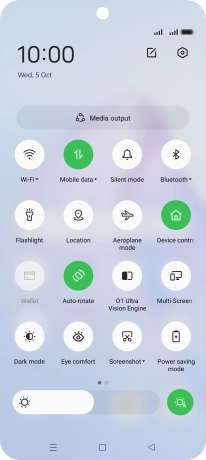
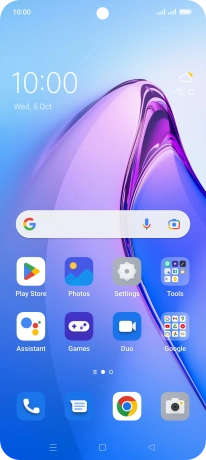
Slide two fingers downwards starting from the top of the screen.
![](http://wmstatic.global.ssl.fastly.net/ml/7151223-f-6e1a0fe6-083b-4ced-8d19-319ccee1427c.png?width=206&height=464)
Press the settings icon.
![](http://wmstatic.global.ssl.fastly.net/ml/7151223-f-54bab751-adff-4cf6-8d7e-536eda42b6b6.png?width=206&height=464)
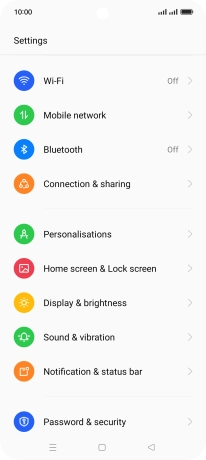
Press Mobile network.
![](http://wmstatic.global.ssl.fastly.net/ml/7151223-f-3b3e8671-21ce-4b1d-bbf8-e08774e8186f.png?width=206&height=464)
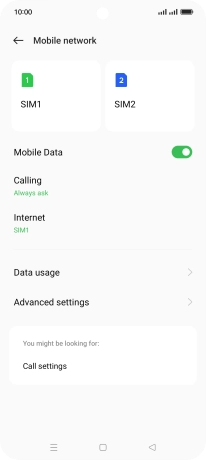
Press the required SIM.
![](http://wmstatic.global.ssl.fastly.net/ml/7151223-f-0bd3bff0-fcab-4e7d-a211-bb86ac183099.png?width=206&height=464)
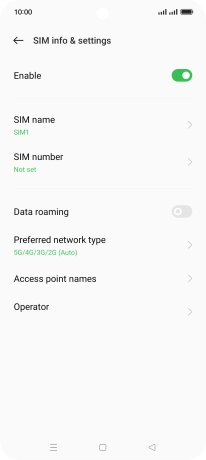
Press Access point names.
![](http://wmstatic.global.ssl.fastly.net/ml/7151223-f-ef6ae6a6-bd90-4f95-8442-4e7ecf828ef2.png?width=206&height=464)
2 Create new data connection
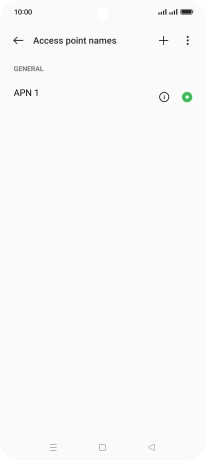
Press the new data connection icon.
![](http://wmstatic.global.ssl.fastly.net/ml/7151223-f-a7a58540-1280-49c4-a724-30e0af5a049c.png?width=206&height=464)
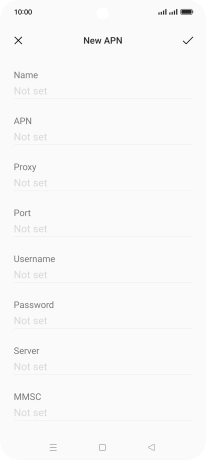
Press the field below "Name" and key in Vodafone Internet.
![](http://wmstatic.global.ssl.fastly.net/ml/7151223-f-d38ebc96-69bb-4349-8243-b24c62148f8d.png?width=206&height=464)
Vodafone Internet
3 Enter APN
Press the field below "APN" and key in wap.vodafone.co.uk.
![](http://wmstatic.global.ssl.fastly.net/ml/7151223-f-d38ebc96-69bb-4349-8243-b24c62148f8d.png?width=206&height=464)
wap.vodafone.co.uk
4 Enter username
Press the field below "Username" and key in wap.
![](http://wmstatic.global.ssl.fastly.net/ml/7151223-f-d38ebc96-69bb-4349-8243-b24c62148f8d.png?width=206&height=464)
wap
5 Enter password
Press the field below "Password" and key in wap.
![](http://wmstatic.global.ssl.fastly.net/ml/7151223-f-d38ebc96-69bb-4349-8243-b24c62148f8d.png?width=206&height=464)
wap
6 Enter country code
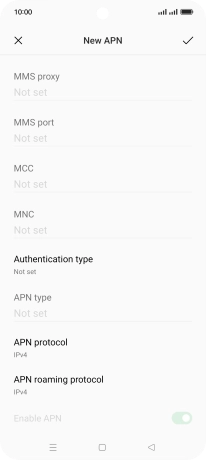
Press the field below "MCC" and key in 234.
![](http://wmstatic.global.ssl.fastly.net/ml/7151223-f-b10c5cfc-367f-4229-ab5e-395975f919dd.png?width=206&height=464)
234
7 Enter network code
Press the field below "MNC" and key in 15.
![](http://wmstatic.global.ssl.fastly.net/ml/7151223-f-b10c5cfc-367f-4229-ab5e-395975f919dd.png?width=206&height=464)
15
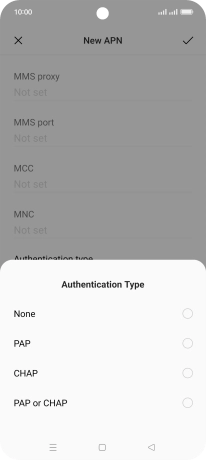
8 Select authentication type
Press Authentication type.
![](http://wmstatic.global.ssl.fastly.net/ml/7151223-f-b10c5cfc-367f-4229-ab5e-395975f919dd.png?width=206&height=464)
Press None.
![](http://wmstatic.global.ssl.fastly.net/ml/7151223-f-9c9be145-19d6-489e-aa95-3c08d5906ffb.png?width=206&height=464)
9 Enter APN type
Press the field below "APN type" and key in default.
![](http://wmstatic.global.ssl.fastly.net/ml/7151223-f-b10c5cfc-367f-4229-ab5e-395975f919dd.png?width=206&height=464)
default
10 Save data connection
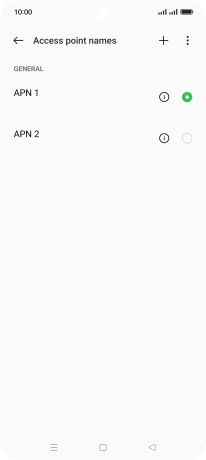
Press the save icon.
![](http://wmstatic.global.ssl.fastly.net/ml/7151223-f-b10c5cfc-367f-4229-ab5e-395975f919dd.png?width=206&height=464)
Press the field next to the data connection to activate it.
![](http://wmstatic.global.ssl.fastly.net/ml/7151223-f-371a7617-20d9-425d-bb05-fa8cd91e0022.png?width=206&height=464)
11 Return to the home screen
Press the Home key to return to the home screen.
![](http://wmstatic.global.ssl.fastly.net/ml/7151223-f-5e5e3057-f90f-4d25-900e-903bfec1131b.png?width=206&height=464)