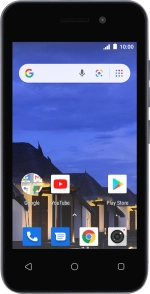
![IMO Q2 Plus](http://wmstatic.global.ssl.fastly.net/ml/7070823-f-681d41ad-7361-449f-9370-e2a556575eeb.png?width=150&height=320)
IMO Q2 Plus
Android 8.1 (Go edition)
1. Find "Users & accounts"
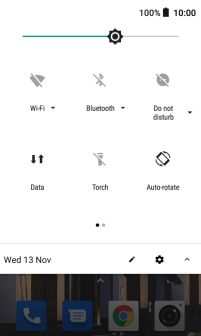
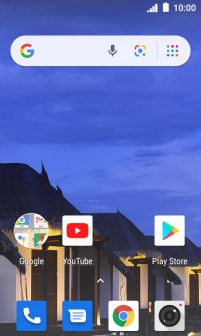
Slide two fingers downwards starting from the top of the screen.
![](http://wmstatic.global.ssl.fastly.net/ml/7070823-f-c19eaaed-01b6-470c-981a-b1837d4064e4.png?width=202&height=336)
Press the settings icon.
![](http://wmstatic.global.ssl.fastly.net/ml/7070823-f-dbfbb895-5acf-42a8-9304-340789a70b38.png?width=202&height=336)
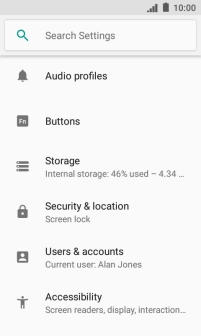
Press Users & accounts.
![](http://wmstatic.global.ssl.fastly.net/ml/7070823-f-ff8b94c8-436d-425a-81d4-474c3da29581.png?width=202&height=336)
2. Create new email account
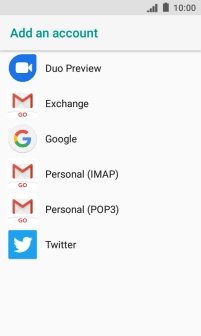
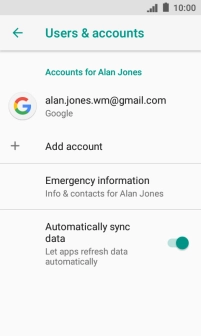
Press Add account.
![](http://wmstatic.global.ssl.fastly.net/ml/7070823-f-c583e022-59e3-4e14-b8a4-ecc0300116c7.png?width=202&height=336)
Press Exchange.
![](http://wmstatic.global.ssl.fastly.net/ml/7070823-f-51eda4f7-02b2-4c83-bf0d-cc4661cf49be.png?width=202&height=336)
3. Enter email address
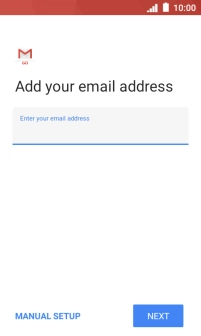
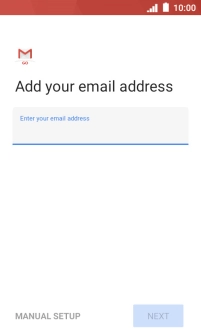
Press the field below "Enter your email address" and key in your email address.
![](http://wmstatic.global.ssl.fastly.net/ml/7070823-f-72b771b1-d786-40ca-b571-97db193b5a4d.png?width=202&height=336)
Press NEXT.
![](http://wmstatic.global.ssl.fastly.net/ml/7070823-f-562d443e-3f07-452a-a7a2-ab7fb89523af.png?width=202&height=336)
4. Select client certificate
To turn on the function, press SELECT and follow the instructions on the screen to install the required certificate.
![](http://wmstatic.global.ssl.fastly.net/ml/7070823-f-5fa4e314-8842-4496-bc11-a17fcd210aa4.png?width=202&height=336)
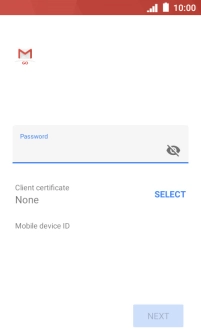
5. Enter password
Press Password and key in the password for your email account.
![](http://wmstatic.global.ssl.fastly.net/ml/7070823-f-5fa4e314-8842-4496-bc11-a17fcd210aa4.png?width=202&height=336)
Press NEXT.
![](http://wmstatic.global.ssl.fastly.net/ml/7070823-f-250c0326-9568-45cc-984b-fb904fd61e17.png?width=202&height=336)
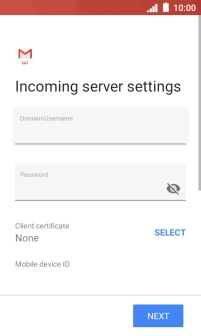
6. Enter domain and username
Press the field below "Domain\Username" and key in the domain and username separated by a "\".
![](http://wmstatic.global.ssl.fastly.net/ml/7070823-f-ff9d3a6e-3596-4558-9ebc-3fbb78ab4bb2.png?width=202&height=336)
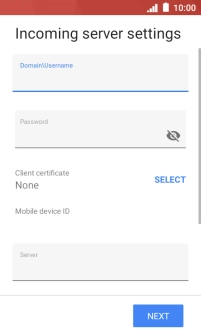
7. Select server address
Press the field below "Server" and key in the server address.
![](http://wmstatic.global.ssl.fastly.net/ml/7070823-f-c3c9ea5b-09ae-4fd5-8d49-508b6a7f20aa.png?width=202&height=336)
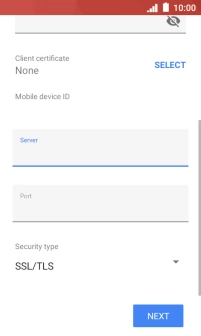
8. Enter port number
Press the field below "Port" and key in the required port number.
![](http://wmstatic.global.ssl.fastly.net/ml/7070823-f-f3fca852-d4a6-465a-a97b-d757fe70f9b1.png?width=202&height=336)
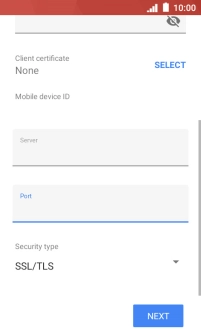
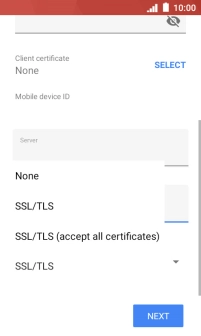
9. Turn SSL encryption on or off
Press the drop down list below "Security type".
![](http://wmstatic.global.ssl.fastly.net/ml/7070823-f-b8c623d4-4e28-4c56-8fba-c360a7454971.png?width=202&height=336)
Press the required setting to turn the function on or off.
![](http://wmstatic.global.ssl.fastly.net/ml/7070823-f-c457a953-85a5-4c9f-9ff3-20fc19857667.png?width=202&height=336)
Press NEXT.
![](http://wmstatic.global.ssl.fastly.net/ml/7070823-f-b8c623d4-4e28-4c56-8fba-c360a7454971.png?width=202&height=336)
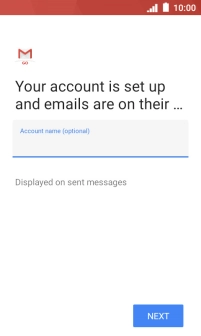
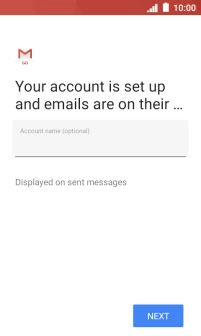
10. Enter email account name
Press the field below "Account name (optional)" and key in the required name.
![](http://wmstatic.global.ssl.fastly.net/ml/7070823-f-33460a83-b75b-4eae-be0c-8a266d2eb47d.png?width=202&height=336)
Press NEXT.
![](http://wmstatic.global.ssl.fastly.net/ml/7070823-f-14b8d2b3-8e94-4033-9525-24ed5d7e9905.png?width=202&height=336)
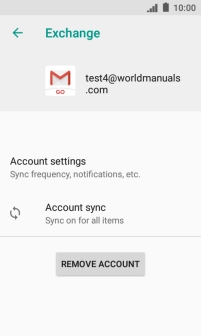
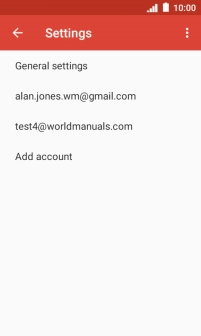
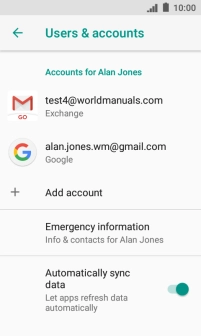
11. Select email account settings
Press the required email account.
![](http://wmstatic.global.ssl.fastly.net/ml/7070823-f-53e41431-1393-4551-8057-22f5b31990f7.png?width=202&height=336)
Press Account settings.
![](http://wmstatic.global.ssl.fastly.net/ml/7070823-f-ed27b5b6-742e-44b7-9e85-a489bcc67c59.png?width=202&height=336)
Press the required email account.
![](http://wmstatic.global.ssl.fastly.net/ml/7070823-f-2b720b71-2043-49d8-b46a-e6a5157c2b92.png?width=202&height=336)
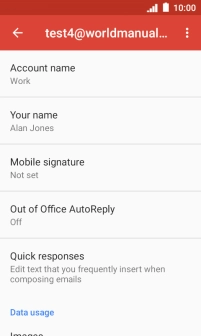
12. Enter sender name
Press Your name.
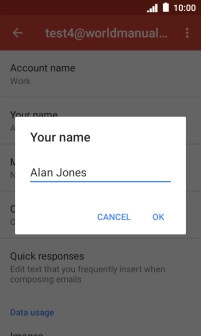
![](http://wmstatic.global.ssl.fastly.net/ml/7070823-f-1dfccb71-805b-4ef6-884d-cb7f4bd2de72.png?width=202&height=336)
Key in the required sender name and press OK.
![](http://wmstatic.global.ssl.fastly.net/ml/7070823-f-a2765c39-bda0-4b34-be37-645cf1ba3371.png?width=202&height=336)
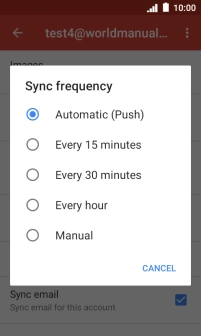
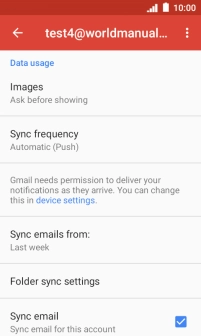
13. Select settings for retrieval of new email messages
Press Sync frequency.
![](http://wmstatic.global.ssl.fastly.net/ml/7070823-f-a528690f-68e4-4f56-8ed7-68bb31b2d401.png?width=202&height=336)
Press the required setting.
![](http://wmstatic.global.ssl.fastly.net/ml/7070823-f-932e34a7-8cd0-4e41-b692-07030c0c0b45.png?width=202&height=336)
14. Turn on email message synchronisation
Press the field next to "Sync email" to turn on the function.
![](http://wmstatic.global.ssl.fastly.net/ml/7070823-f-a528690f-68e4-4f56-8ed7-68bb31b2d401.png?width=202&height=336)
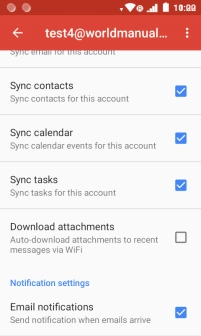
15. Turn contact synchronisation on or off
Press the field next to "Sync contacts" to turn the function on or off.
![](http://wmstatic.global.ssl.fastly.net/ml/7070823-f-afd555e3-edeb-43ae-84e8-f71d69c55bfd.png?width=202&height=336)
16. Turn calendar synchronisation on or off
Press the field next to "Sync calendar" to turn the function on or off.
![](http://wmstatic.global.ssl.fastly.net/ml/7070823-f-afd555e3-edeb-43ae-84e8-f71d69c55bfd.png?width=202&height=336)
17. Turn email message notifications on or off
Press the field next to "Email notifications" to turn the function on or off.
![](http://wmstatic.global.ssl.fastly.net/ml/7070823-f-afd555e3-edeb-43ae-84e8-f71d69c55bfd.png?width=202&height=336)
18. Return to the home screen
Press the Home key to return to the home screen.
![](http://wmstatic.global.ssl.fastly.net/ml/7070823-f-afd555e3-edeb-43ae-84e8-f71d69c55bfd.png?width=202&height=336)