![Motorola Moto E7](http://wmstatic.global.ssl.fastly.net/ml/7151223-f-98a9227d-982a-4b9b-aaac-0219bd3abe3b.png?width=150&height=320)
Motorola Moto E7
Android 10.0
1 Find "Accounts"
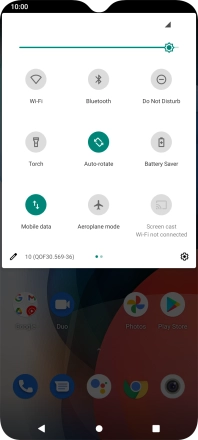
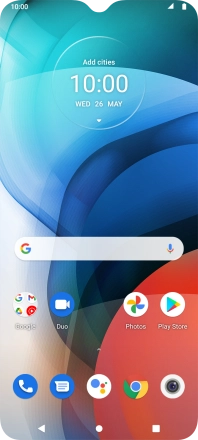
Slide two fingers downwards starting from the top of the screen.
![](http://wmstatic.global.ssl.fastly.net/ml/7151223-f-95aebe1d-1a9e-4bc5-8ed1-61082c43ad8c.png?width=198&height=444)
Press the settings icon.
![](http://wmstatic.global.ssl.fastly.net/ml/7151223-f-6c0c1bcc-4041-42df-8928-84094fb386be.png?width=198&height=444)
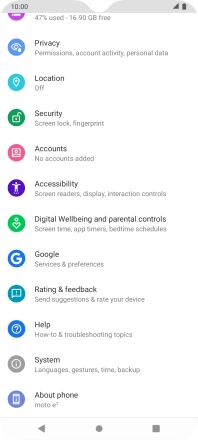
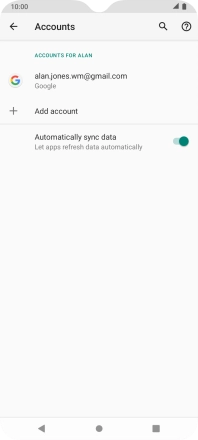
Press Accounts.
![](http://wmstatic.global.ssl.fastly.net/ml/7151223-f-2b7f11cb-71fb-4043-a6db-0f0452868928.png?width=198&height=444)
2 Create new email account
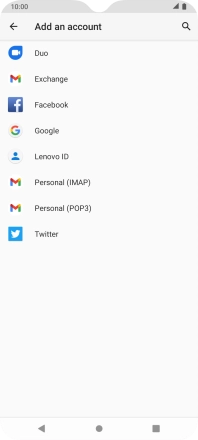
Press Add account.
![](http://wmstatic.global.ssl.fastly.net/ml/7151223-f-c6e51b97-9bc8-448b-b9d2-1f1cd368da0a.png?width=198&height=444)
3 Select server type
Press Exchange.
![](http://wmstatic.global.ssl.fastly.net/ml/7151223-f-0639e62f-897e-4c28-980d-eea2b509110d.png?width=198&height=444)
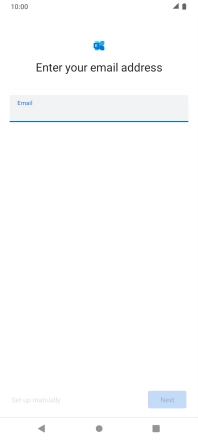
4 Enter email address
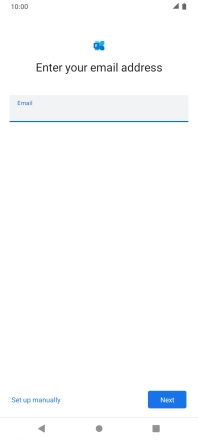
Press the field below "Email" and key in your email address.
![](http://wmstatic.global.ssl.fastly.net/ml/7151223-f-14e79230-3d1f-4e32-ac31-e7f5ea4add09.png?width=198&height=444)
Press Next.
![](http://wmstatic.global.ssl.fastly.net/ml/7151223-f-d7662d6e-8b6c-4517-b544-4e7f59d0c76c.png?width=198&height=444)
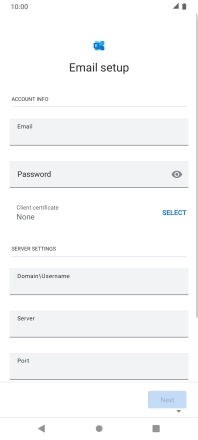
5 Enter password
Press Password and key in the password for your email account.
![](http://wmstatic.global.ssl.fastly.net/ml/7151223-f-7c04c65f-d4d5-4105-9f4b-dc5e279b44fd.png?width=198&height=444)
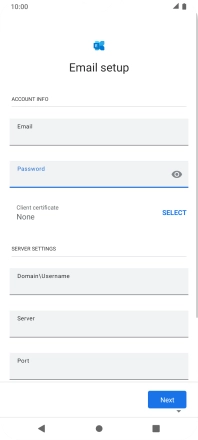
6 Select client certificate
To turn on the function, press SELECT and follow the instructions on the screen to install the required certificate.
![](http://wmstatic.global.ssl.fastly.net/ml/7151223-f-3823ee34-4db3-4538-92f9-361594a985e8.png?width=198&height=444)
7 Enter domain and username
Press the field below "Domain\Username" and key in the domain and username separated by a "\".
![](http://wmstatic.global.ssl.fastly.net/ml/7151223-f-3823ee34-4db3-4538-92f9-361594a985e8.png?width=198&height=444)
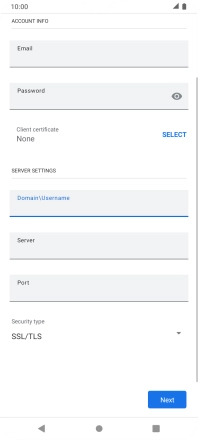
8 Select server address
Press the field below "Server" and key in the server address.
![](http://wmstatic.global.ssl.fastly.net/ml/7151223-f-3d58e54a-0fb8-4fb6-99e8-1decd0121b36.png?width=198&height=444)
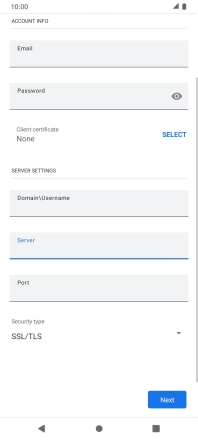
9 Enter port number
Press the field below "Port" and key in the required port number.
![](http://wmstatic.global.ssl.fastly.net/ml/7151223-f-1213fca6-633d-4303-a84d-3776911ce27d.png?width=198&height=444)
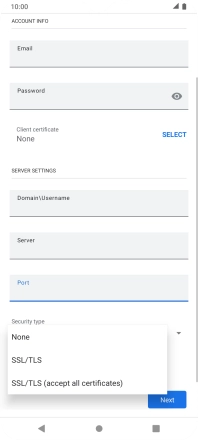
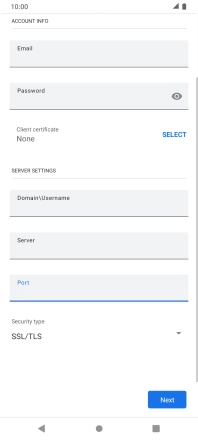
10 Turn SSL encryption on or off
Press the drop down list below "Security type".
![](http://wmstatic.global.ssl.fastly.net/ml/7151223-f-1ef74c56-341e-46d9-bae7-e7f3bfcfff54.png?width=198&height=444)
Press the required setting.
![](http://wmstatic.global.ssl.fastly.net/ml/7151223-f-2d0b70c0-53b1-49c4-9d80-1d308b71ddb5.png?width=198&height=444)
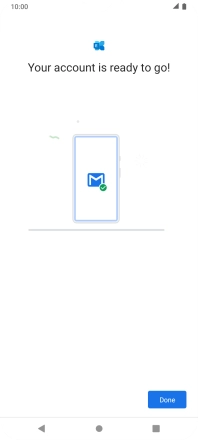
Press Next and follow the instructions on the screen to finish setting up your phone.
![](http://wmstatic.global.ssl.fastly.net/ml/7151223-f-1ef74c56-341e-46d9-bae7-e7f3bfcfff54.png?width=198&height=444)
Press Done.
![](http://wmstatic.global.ssl.fastly.net/ml/7151223-f-3e44e442-4f93-4097-9c40-df6bf8c09075.png?width=198&height=444)
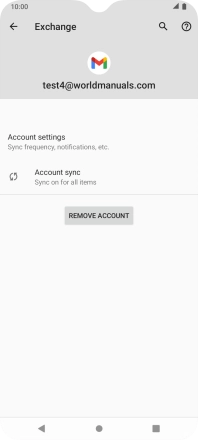
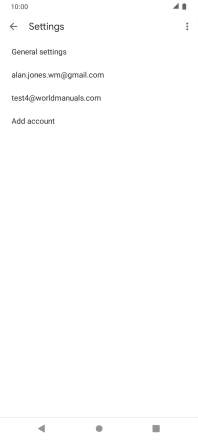
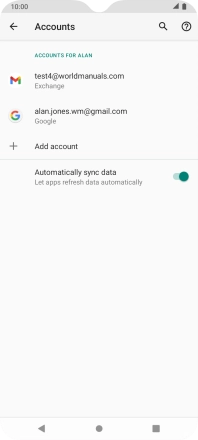
11 Select email account settings
Press the required account.
![](http://wmstatic.global.ssl.fastly.net/ml/7151223-f-1f2163a6-7942-4d4b-b906-97ac250a94a3.png?width=198&height=444)
Press Account settings.
![](http://wmstatic.global.ssl.fastly.net/ml/7151223-f-cbf78d3c-d3c4-4cf8-bc91-de8133b9500b.png?width=198&height=444)
Press the required email account.
![](http://wmstatic.global.ssl.fastly.net/ml/7151223-f-8abd3490-8552-47d9-97d7-df7436ebdcff.png?width=198&height=444)
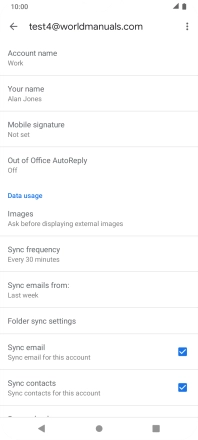
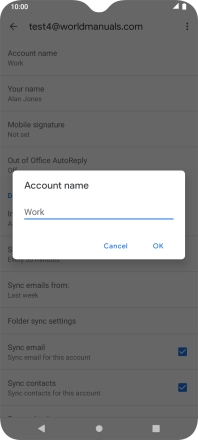
12 Enter account name
Press Account name.
![](http://wmstatic.global.ssl.fastly.net/ml/7151223-f-d6d34389-2f29-4b34-95f6-74131483fe46.png?width=198&height=444)
Key in the required account name and press OK.
![](http://wmstatic.global.ssl.fastly.net/ml/7151223-f-87bbbb53-7fa1-437d-bcc4-a326484a956b.png?width=198&height=444)
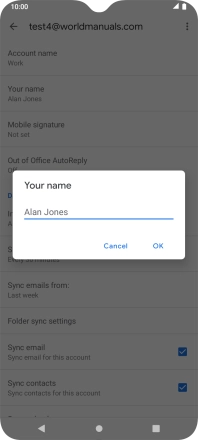
13 Enter sender name
Press Your name.
![](http://wmstatic.global.ssl.fastly.net/ml/7151223-f-d6d34389-2f29-4b34-95f6-74131483fe46.png?width=198&height=444)
Key in the required sender name and press OK.
![](http://wmstatic.global.ssl.fastly.net/ml/7151223-f-c32122f2-6254-4910-9b72-34e95a83d07c.png?width=198&height=444)
14 Select settings for retrieval of new email messages
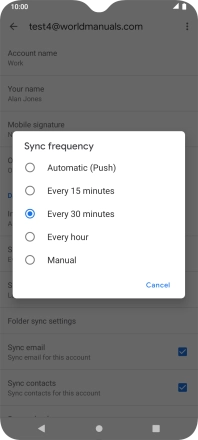
Press Sync frequency.
![](http://wmstatic.global.ssl.fastly.net/ml/7151223-f-d6d34389-2f29-4b34-95f6-74131483fe46.png?width=198&height=444)
Press the required setting.
![](http://wmstatic.global.ssl.fastly.net/ml/7151223-f-10f02f19-a352-47ed-9fae-e04ec5236702.png?width=198&height=444)
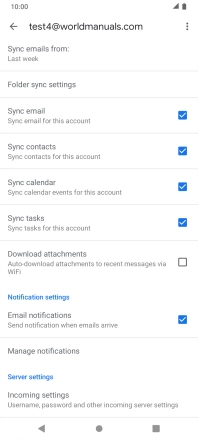
15 Turn on email message synchronisation
Press the field next to "Sync email" to turn on the function.
![](http://wmstatic.global.ssl.fastly.net/ml/7151223-f-8b8185d9-09f6-437e-9276-cc8fb073ba2a.png?width=198&height=444)
16 Turn contact synchronisation on or off
Press the field next to "Sync contacts" to turn the function on or off.
![](http://wmstatic.global.ssl.fastly.net/ml/7151223-f-8b8185d9-09f6-437e-9276-cc8fb073ba2a.png?width=198&height=444)
17 Turn calendar synchronisation on or off
Press the field next to "Sync calendar" to turn the function on or off.
![](http://wmstatic.global.ssl.fastly.net/ml/7151223-f-8b8185d9-09f6-437e-9276-cc8fb073ba2a.png?width=198&height=444)
18 Turn email message notifications on or off
Press the field next to "Email notifications" to turn the function on or off.
![](http://wmstatic.global.ssl.fastly.net/ml/7151223-f-8b8185d9-09f6-437e-9276-cc8fb073ba2a.png?width=198&height=444)
19 Return to the home screen
Press the Home key to return to the home screen.
![](http://wmstatic.global.ssl.fastly.net/ml/7151223-f-8b8185d9-09f6-437e-9276-cc8fb073ba2a.png?width=198&height=444)