![Motorola Moto G8 POWER](http://wmstatic.global.ssl.fastly.net/ml/7151223-f-93096ccf-d101-4491-93e3-1690b6ec8feb.png?width=150&height=320)
Motorola Moto G8 POWER
Android 10.0
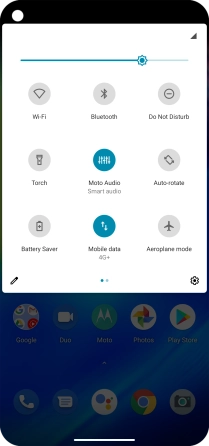
1 Find "Accounts"
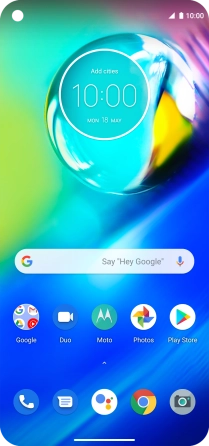
Slide two fingers downwards starting from the top of the screen.
![](http://wmstatic.global.ssl.fastly.net/ml/7151223-f-9170bd5d-cd05-4236-8b86-766b45c008f3.png?width=210&height=446)
Press the settings icon.
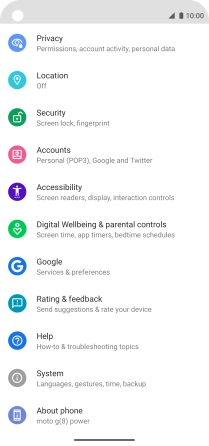
![](http://wmstatic.global.ssl.fastly.net/ml/7151223-f-b56db2f6-0fd5-4293-bd04-b70d77d12bdb.png?width=210&height=446)
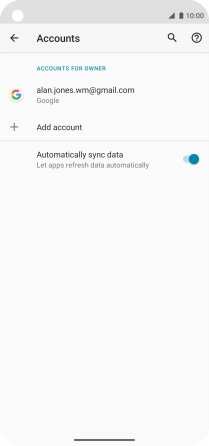
Press Accounts.
![](http://wmstatic.global.ssl.fastly.net/ml/7151223-f-ce8ed5c6-7a9d-4308-b856-fee9f0cc3ffa.png?width=210&height=446)
2 Create new email account
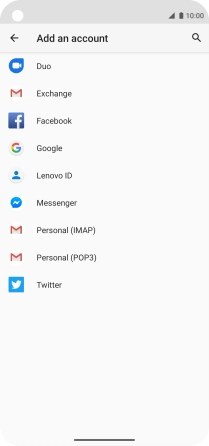
Press Add account.
![](http://wmstatic.global.ssl.fastly.net/ml/7151223-f-73641b1a-7daa-44d5-afec-755a7a823d9b.png?width=210&height=446)
3 Select server type
Press Exchange.
![](http://wmstatic.global.ssl.fastly.net/ml/7151223-f-e0754096-e5e3-43a7-b38b-2268ccf48a52.png?width=210&height=446)
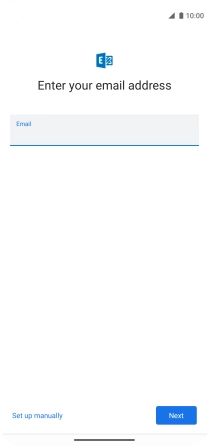
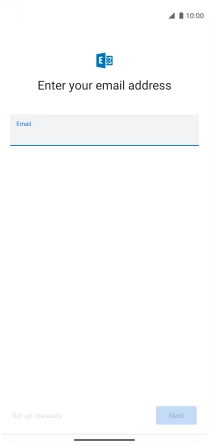
4 Enter email address
Press the field below "Email" and key in your email address.
![](http://wmstatic.global.ssl.fastly.net/ml/7151223-f-d3f5eacb-6dc4-499f-8f81-70ab89695692.png?width=210&height=446)
Press Next.
![](http://wmstatic.global.ssl.fastly.net/ml/7151223-f-6cf9ffc4-9851-4a54-bd5a-1aa989e7d465.png?width=210&height=446)
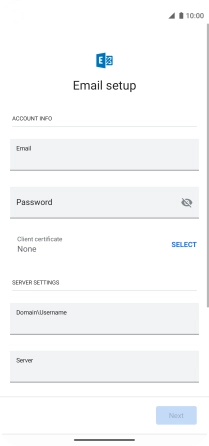
5 Enter password
Press Password and key in the password for your email account.
![](http://wmstatic.global.ssl.fastly.net/ml/7151223-f-c354494b-4572-4959-93fa-682f81649516.png?width=210&height=446)
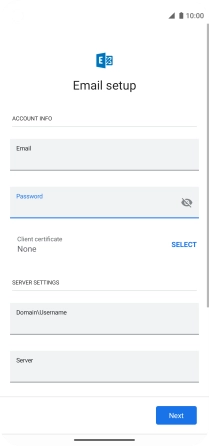
6 Select client certificate
To turn on the function, press SELECT and follow the instructions on the screen to install the required certificate.
![](http://wmstatic.global.ssl.fastly.net/ml/7151223-f-b79abcf8-0095-48be-80a1-6ec52641ee90.png?width=210&height=446)
7 Enter domain and username
Press the field below "Domain\Username" and key in the domain and username separated by a "\".
![](http://wmstatic.global.ssl.fastly.net/ml/7151223-f-b79abcf8-0095-48be-80a1-6ec52641ee90.png?width=210&height=446)
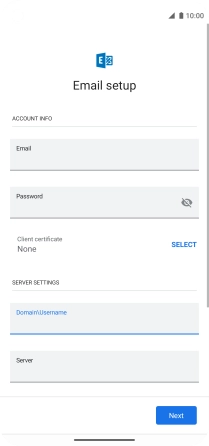
8 Select server address
Press the field below "Server" and key in the server address.
![](http://wmstatic.global.ssl.fastly.net/ml/7151223-f-cb5b6b9d-a569-4977-aa2c-570f24648392.png?width=210&height=446)
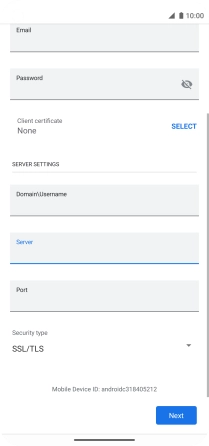
9 Enter port number
Press the field below "Port" and key in the required port number.
![](http://wmstatic.global.ssl.fastly.net/ml/7151223-f-3407c1bc-db8b-428b-b271-a6ee64dfd14a.png?width=210&height=446)
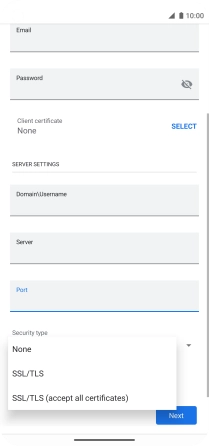
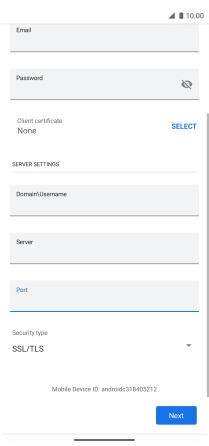
10 Turn SSL encryption on or off
Press the drop down list below "Security type".
![](http://wmstatic.global.ssl.fastly.net/ml/7151223-f-eceb38d5-d25c-4717-9f43-1b7628c87d7d.png?width=210&height=446)
Press the required setting.
![](http://wmstatic.global.ssl.fastly.net/ml/7151223-f-8314b5a4-b976-4bf5-aea4-fb2b881c0e88.png?width=210&height=446)
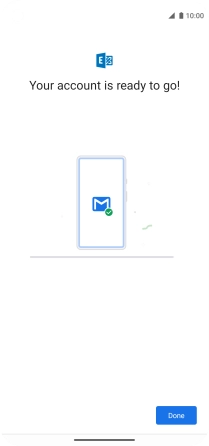
Press Next and follow the instructions on the screen to finish setting up your phone.
![](http://wmstatic.global.ssl.fastly.net/ml/7151223-f-eceb38d5-d25c-4717-9f43-1b7628c87d7d.png?width=210&height=446)
Press Done.
![](http://wmstatic.global.ssl.fastly.net/ml/7151223-f-b48722ef-807b-4df6-9292-3ebe72b872fc.png?width=210&height=446)
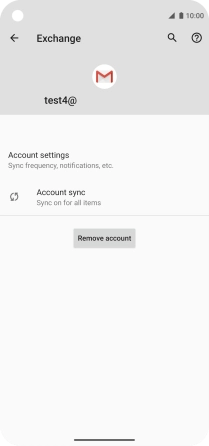
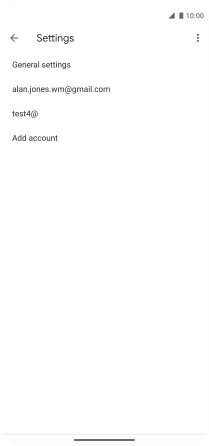
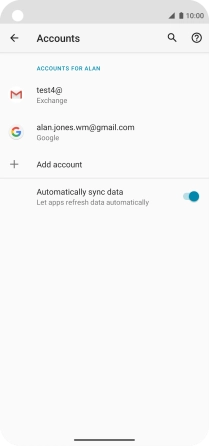
11 Select email account settings
Press the required account.
![](http://wmstatic.global.ssl.fastly.net/ml/7151223-f-d9a918c2-df3e-47cf-88f9-b28a743e5668.png?width=210&height=446)
Press Account settings.
![](http://wmstatic.global.ssl.fastly.net/ml/7151223-f-1ab70634-6aa9-418c-977e-1c4cdea738cf.png?width=210&height=446)
Press the required email account.
![](http://wmstatic.global.ssl.fastly.net/ml/7151223-f-f88e0995-fb0e-4782-83d2-b9c5eb8ba0ed.png?width=210&height=446)
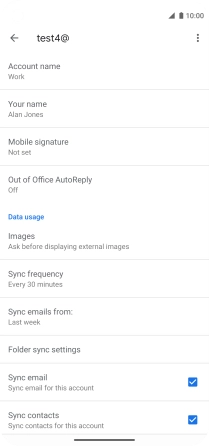
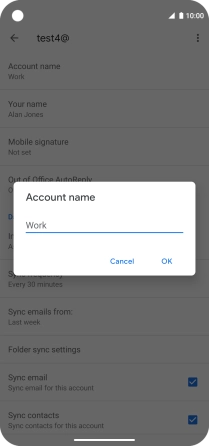
12 Enter account name
Press Account name.
![](http://wmstatic.global.ssl.fastly.net/ml/7151223-f-99990153-38df-4261-b4a7-e7ac8a137e50.png?width=210&height=446)
Key in the required account name and press OK.
![](http://wmstatic.global.ssl.fastly.net/ml/7151223-f-29a1d124-7c31-4a68-9200-6a4db9aea7ce.png?width=210&height=446)
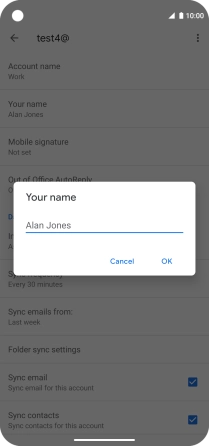
13 Enter sender name
Press Your name.
![](http://wmstatic.global.ssl.fastly.net/ml/7151223-f-99990153-38df-4261-b4a7-e7ac8a137e50.png?width=210&height=446)
Key in the required sender name and press OK.
![](http://wmstatic.global.ssl.fastly.net/ml/7151223-f-0c4afa7b-1406-4b4a-af4e-ba6e92304f82.png?width=210&height=446)
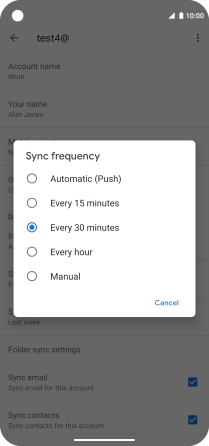
14 Select settings for retrieval of new email messages
Press Sync frequency.
![](http://wmstatic.global.ssl.fastly.net/ml/7151223-f-99990153-38df-4261-b4a7-e7ac8a137e50.png?width=210&height=446)
Press the required setting.
![](http://wmstatic.global.ssl.fastly.net/ml/7151223-f-2c23b657-2cc5-4c36-84cb-17c56e7c3a80.png?width=210&height=446)
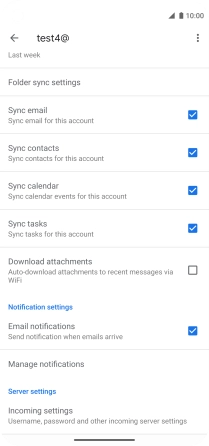
15 Turn on email message synchronisation
Press the field next to "Sync email" to turn on the function.
![](http://wmstatic.global.ssl.fastly.net/ml/7151223-f-d18e71a6-4ab2-4f8a-8067-c949df0ceaff.png?width=210&height=446)
16 Turn contact synchronisation on or off
Press the field next to "Sync contacts" to turn the function on or off.
![](http://wmstatic.global.ssl.fastly.net/ml/7151223-f-d18e71a6-4ab2-4f8a-8067-c949df0ceaff.png?width=210&height=446)
17 Turn calendar synchronisation on or off
Press the field next to "Sync calendar" to turn the function on or off.
![](http://wmstatic.global.ssl.fastly.net/ml/7151223-f-d18e71a6-4ab2-4f8a-8067-c949df0ceaff.png?width=210&height=446)
18 Turn email message notifications on or off
Press the field next to "Email notifications" to turn the function on or off.
![](http://wmstatic.global.ssl.fastly.net/ml/7151223-f-d18e71a6-4ab2-4f8a-8067-c949df0ceaff.png?width=210&height=446)
19 Return to the home screen
Slide your finger upwards starting from the bottom of the screen to return to the home screen.
![](http://wmstatic.global.ssl.fastly.net/ml/7151223-f-d18e71a6-4ab2-4f8a-8067-c949df0ceaff.png?width=210&height=446)