![Motorola Moto E32](http://wmstatic.global.ssl.fastly.net/ml/7151223-f-a338dec7-e3b2-44e1-800d-37cae2e608a8.png?width=150&height=320)
Motorola Moto E32
Android 11.0
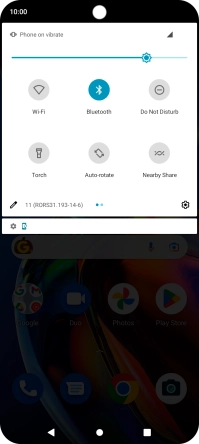
1. Find "Accounts"
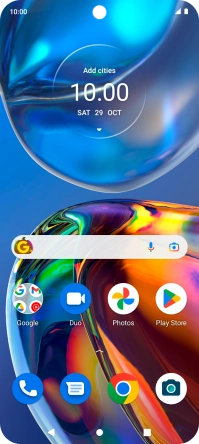
Slide two fingers downwards starting from the top of the screen.
![](http://wmstatic.global.ssl.fastly.net/ml/7151223-f-c177f44f-1de2-4965-8ffc-e4fad282d626.png?width=200&height=444)
Press the settings icon.
![](http://wmstatic.global.ssl.fastly.net/ml/7151223-f-e3176926-b5b0-4604-8c7b-ef1983a11448.png?width=200&height=444)
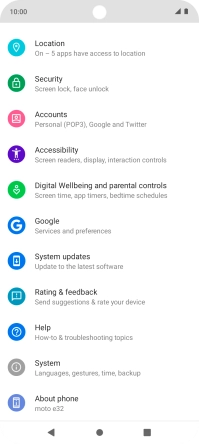
Press Accounts.
![](http://wmstatic.global.ssl.fastly.net/ml/7151223-f-bd8ce67e-9426-4e6f-a31e-cdb75cfbfb1c.png?width=200&height=444)
2. Create new email account
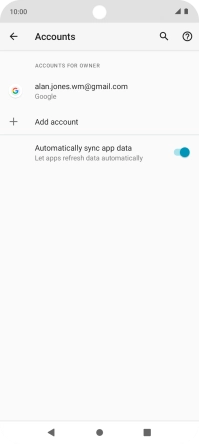
Press Add account.
![](http://wmstatic.global.ssl.fastly.net/ml/7151223-f-19b9d578-338a-42a5-9a9c-cc79316619e5.png?width=200&height=444)
3. Select server type
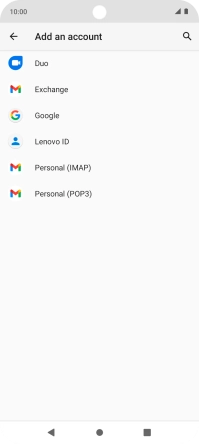
Press Exchange.
![](http://wmstatic.global.ssl.fastly.net/ml/7151223-f-da3efbdc-1870-4c82-81fb-0e9248dfce1e.png?width=200&height=444)
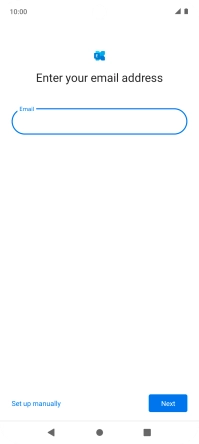
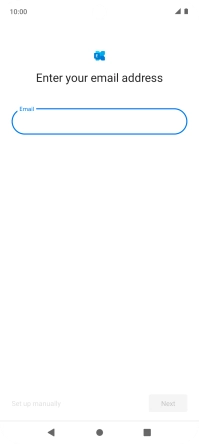
4. Enter email address
Press the field below "Email" and key in your email address.
![](http://wmstatic.global.ssl.fastly.net/ml/7151223-f-0c085c58-e438-4730-a6ab-6a012840d276.png?width=200&height=444)
Press Next.
![](http://wmstatic.global.ssl.fastly.net/ml/7151223-f-5b02912c-4d0d-40e4-ac6b-8e6b9a2a76e2.png?width=200&height=444)
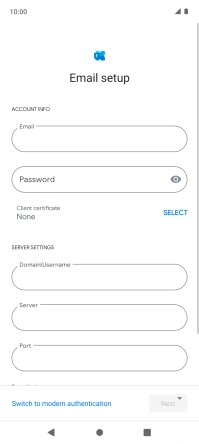
5. Enter password
Press Password and key in the password for your email account.
![](http://wmstatic.global.ssl.fastly.net/ml/7151223-f-7551bf61-2f4c-49b7-abc3-4f660de4af47.png?width=200&height=444)
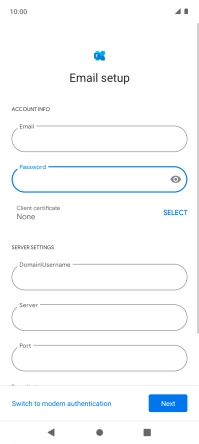
6. Select client certificate
To turn on the function, press SELECT and follow the instructions on the screen to install the required certificate.
![](http://wmstatic.global.ssl.fastly.net/ml/7151223-f-57e3ca71-77b3-476c-bbc6-cccd4977804b.png?width=200&height=444)
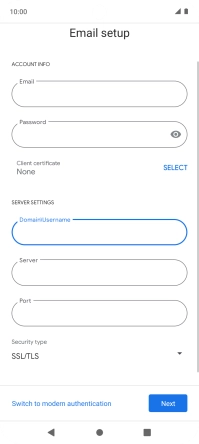
7. Enter domain and username
Press the field below "Domain\Username" and key in the domain and username separated by a "\".
![](http://wmstatic.global.ssl.fastly.net/ml/7151223-f-57e3ca71-77b3-476c-bbc6-cccd4977804b.png?width=200&height=444)
8. Select server address
Press the field below "Server" and key in the server address.
![](http://wmstatic.global.ssl.fastly.net/ml/7151223-f-039072c6-2a4e-4884-8fa4-300e4ea8bfd8.png?width=200&height=444)
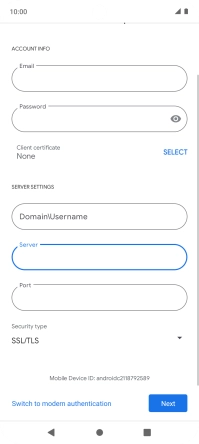
9. Enter port number
Press the field below "Port" and key in the required port number.
![](http://wmstatic.global.ssl.fastly.net/ml/7151223-f-80d818b7-2f83-44e1-8330-f7c8c5602ed1.png?width=200&height=444)
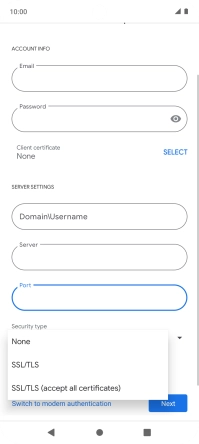
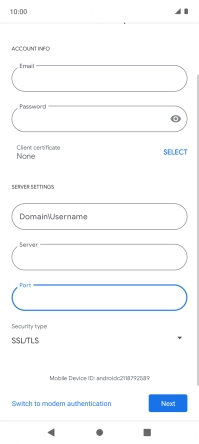
10. Turn SSL encryption on or off
Press the drop down list below "Security type".
![](http://wmstatic.global.ssl.fastly.net/ml/7151223-f-8da00609-b50a-49a8-bebd-c52f594633cb.png?width=200&height=444)
Press the required setting.
![](http://wmstatic.global.ssl.fastly.net/ml/7151223-f-bb41b2de-10bb-403c-a52a-2f6ec973eae7.png?width=200&height=444)
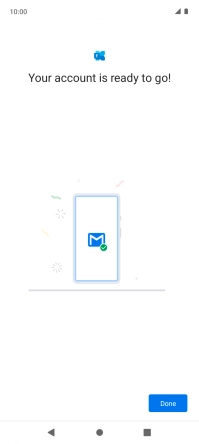
Press Next and follow the instructions on the screen to finish setting up your phone.
![](http://wmstatic.global.ssl.fastly.net/ml/7151223-f-8da00609-b50a-49a8-bebd-c52f594633cb.png?width=200&height=444)
Press Done.
![](http://wmstatic.global.ssl.fastly.net/ml/7151223-f-6ffc8e07-3d7f-4128-8063-fe6f7f5a21dc.png?width=200&height=444)
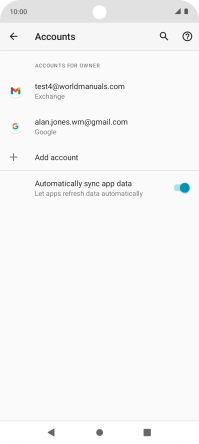
11. Select email account settings
Press the required account.
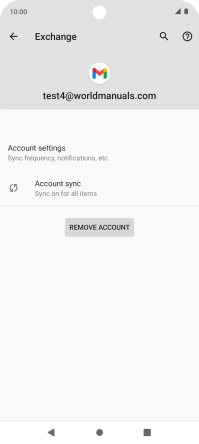
![](http://wmstatic.global.ssl.fastly.net/ml/7151223-f-f0ef156b-b0f1-4431-8b99-397b29b66561.png?width=200&height=444)
Press Account settings.
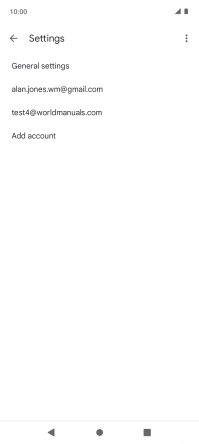
![](http://wmstatic.global.ssl.fastly.net/ml/7151223-f-d6a0279e-f61b-4bea-b619-7ee5e7330c17.png?width=200&height=444)
Press the required email account.
![](http://wmstatic.global.ssl.fastly.net/ml/7151223-f-46827df8-1c7f-49d7-82a4-3327da9a2eea.png?width=200&height=444)
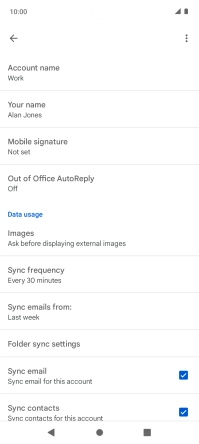
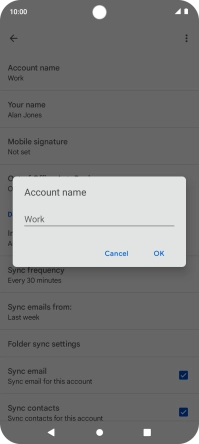
12. Enter account name
Press Account name.
![](http://wmstatic.global.ssl.fastly.net/ml/7151223-f-16f5cd0e-2b13-4776-8377-bb81e2367b39.png?width=200&height=444)
Key in the required account name and press OK.
![](http://wmstatic.global.ssl.fastly.net/ml/7151223-f-35dd155c-9f72-48ee-80fb-65cc42cfcbd7.png?width=200&height=444)
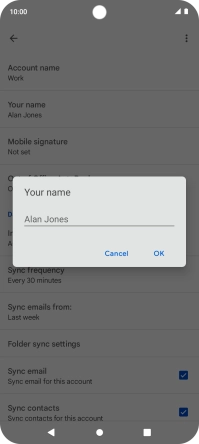
13. Enter sender name
Press Your name.
![](http://wmstatic.global.ssl.fastly.net/ml/7151223-f-16f5cd0e-2b13-4776-8377-bb81e2367b39.png?width=200&height=444)
Key in the required sender name and press OK.
![](http://wmstatic.global.ssl.fastly.net/ml/7151223-f-710c266c-cf70-4e54-9421-6476101cc204.png?width=200&height=444)
14. Select settings for retrieval of new email messages
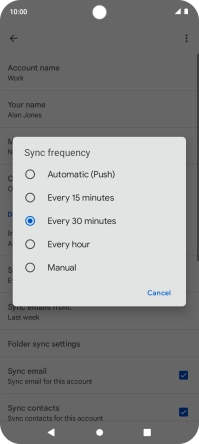
Press Sync frequency.
![](http://wmstatic.global.ssl.fastly.net/ml/7151223-f-16f5cd0e-2b13-4776-8377-bb81e2367b39.png?width=200&height=444)
Press the required setting.
![](http://wmstatic.global.ssl.fastly.net/ml/7151223-f-7f1873a6-cd6d-489c-9db7-a4f0beef11f7.png?width=200&height=444)
15. Turn on email message synchronisation
Press the field next to "Sync email" to turn on the function.
![](http://wmstatic.global.ssl.fastly.net/ml/7151223-f-16f5cd0e-2b13-4776-8377-bb81e2367b39.png?width=200&height=444)
16. Turn contact synchronisation on or off
Press the field next to "Sync contacts" to turn the function on or off.
![](http://wmstatic.global.ssl.fastly.net/ml/7151223-f-16f5cd0e-2b13-4776-8377-bb81e2367b39.png?width=200&height=444)
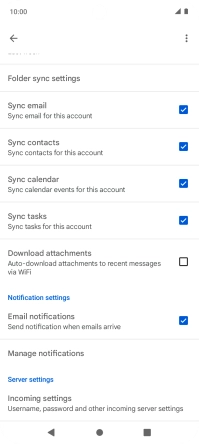
17. Turn calendar synchronisation on or off
Press the field next to "Sync calendar" to turn the function on or off.
![](http://wmstatic.global.ssl.fastly.net/ml/7151223-f-65b4dffa-83fb-462e-95f0-3543251a5edd.png?width=200&height=444)
18. Turn email message notifications on or off
Press the field next to "Email notifications" to turn the function on or off.
![](http://wmstatic.global.ssl.fastly.net/ml/7151223-f-65b4dffa-83fb-462e-95f0-3543251a5edd.png?width=200&height=444)
19. Return to the home screen
Press the Home key to return to the home screen.
![](http://wmstatic.global.ssl.fastly.net/ml/7151223-f-65b4dffa-83fb-462e-95f0-3543251a5edd.png?width=200&height=444)