![Motorola razr 40 ultra](http://wmstatic.global.ssl.fastly.net/ml/7151223-f-9a697841-dc19-48a8-bac8-d774a5b6e40a.png?width=150&height=320)
Motorola razr 40 ultra
Android 13
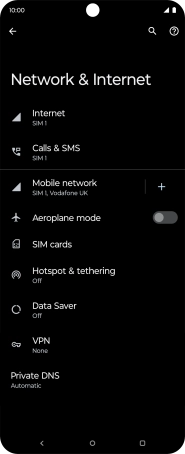
1. Find "Mobile network"
Slide two fingers downwards starting from the top of the screen.
![](http://wmstatic.global.ssl.fastly.net/ml/7151223-f-5e300eec-2cb0-4282-b24b-3ee7549bb307.png?width=186&height=454)
Press the settings icon.
![](http://wmstatic.global.ssl.fastly.net/ml/7151223-f-213c6597-72df-4b25-9cd9-0b4b36e03373.png?width=186&height=454)
Press Network & Internet.
![](http://wmstatic.global.ssl.fastly.net/ml/7151223-f-c5322638-ffeb-45de-b48a-2ea4ea26408a.png?width=186&height=454)
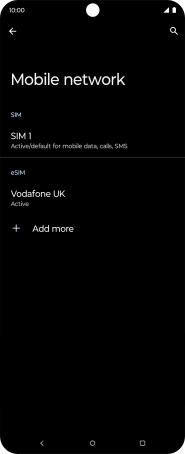
Press Mobile network.
![](http://wmstatic.global.ssl.fastly.net/ml/7151223-f-f2ebf5e5-9e39-49d0-aee1-0b9521f3f631.png?width=186&height=454)
2. Select eSIM
Press the required eSIM.
![](http://wmstatic.global.ssl.fastly.net/ml/7151223-f-5d346e01-c5a1-438d-8e6f-a526df7eb64c.png?width=186&height=454)
3. Delete eSIM
Press Erase SIM and follow the instructions on the screen to delete your eSIM.
![](http://wmstatic.global.ssl.fastly.net/ml/7151223-f-c4c38a54-23cd-482c-a57a-3e2d443a972f.png?width=186&height=454)
4. Return to the home screen
Press the Home key to return to the home screen.
![](http://wmstatic.global.ssl.fastly.net/ml/7151223-f-c4c38a54-23cd-482c-a57a-3e2d443a972f.png?width=186&height=454)