![Samsung Galaxy A33 5G](http://wmstatic.global.ssl.fastly.net/ml/7151223-f-8c560a9a-4eba-4dd0-b638-02d8aace397f.png?width=150&height=320)
Samsung Galaxy A33 5G
Android 12.0
1 Find "Manage accounts"
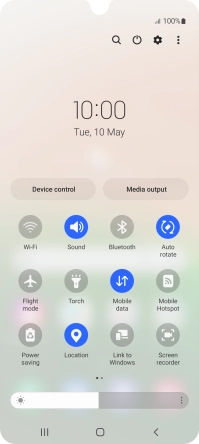
Slide two fingers downwards starting from the top of the screen.
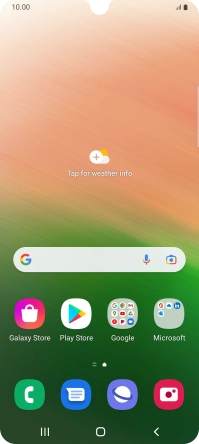
![](http://wmstatic.global.ssl.fastly.net/ml/7151223-f-005efa7d-4293-4645-b8c6-863bef172246.png?width=200&height=444)
Press the settings icon.
![](http://wmstatic.global.ssl.fastly.net/ml/7151223-f-61523db8-293c-48ef-a5e0-fa93519d5392.png?width=200&height=444)
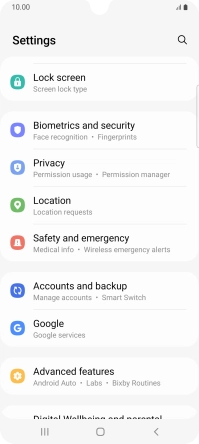
Press Accounts and backup.
![](http://wmstatic.global.ssl.fastly.net/ml/7151223-f-b9518016-d6d8-45a4-9867-5ff2ee42dbe1.png?width=200&height=444)
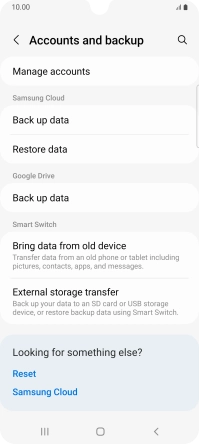
Press Manage accounts.
![](http://wmstatic.global.ssl.fastly.net/ml/7151223-f-03fcf28c-1423-4a41-9c0b-ad44241db662.png?width=200&height=444)
2 Turn automatic synchronisation of content on or off
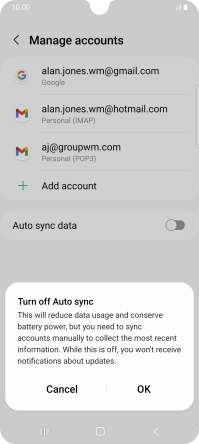
Press the indicator next to "Auto sync data" to turn the function on or off.
![](http://wmstatic.global.ssl.fastly.net/ml/7151223-f-3f0f6282-2159-425f-b7dd-3655c8029692.png?width=200&height=444)
Press OK.
![](http://wmstatic.global.ssl.fastly.net/ml/7151223-f-b39355ef-5eba-4bba-825e-3783532bfa21.png?width=200&height=444)
3 Return to the home screen
Press the Home key to return to the home screen.
![](http://wmstatic.global.ssl.fastly.net/ml/7151223-f-3f0f6282-2159-425f-b7dd-3655c8029692.png?width=200&height=444)